


1.Create a NURBS circle, radius = 1, scale the circle to 50x50.
2.Scale the CV to square off the circle.
3.Change the frames from 24 to 200.
4.In the channel editor go to channels > key all circle at 1. A red line should appear at the number one on the time slider.
5.Move the time slider to 200. Translate the circle to 200 on the z-axis. In the channel editor go to channels > key all the circle at 200. A red line should appear at the number 200 on the time slider.
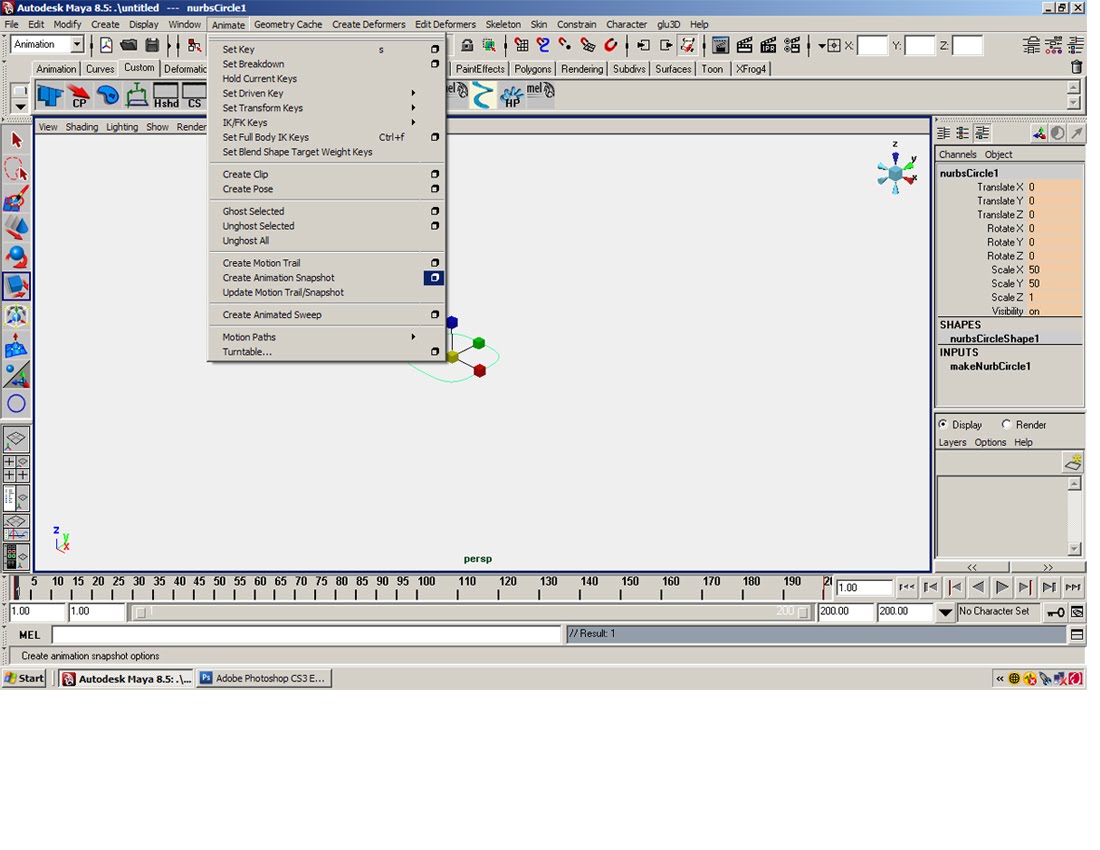
6.In the animation menu go to animation> Create Animation Snapshot click on the box.
7.In the Create Animation Snapshot window select Time Slider, change the increments to 12.00 and select Fast Up Date on Demand.
8.A snap shot group should appear in the options window. Create 5 layers: structure, glass, slabs, snapshot and circle. Put the stuff on the right layers.
9.Turn off the snapshot layer. Select the circle. Go to the surface menu. Select surface>planer click on the box.
10.Select polygons, quads, standard fit, and turn the sliders on the bottom of the window all the way down.
11.Extrude the polygon surface .337, use the “local translate z” for an exact measure.
12.Select the extruded polygon surface. In the animation menu go to animation> Create 13.Animation Snapshot click on the box.
14.In the Create Animation Snapshot window select Time Slider, change the increments to 12.00 and select Fast Up Date on Demand.
15.Put the snapshot in the slab layer and turn it off. Open the layer with the snap shot of circles.
16.In the surface menu, go to surface>loft, click on the box. Select NURBS and make the section span= 2
17. Put lofted surface on glass layer. Close snapshot layer.
18.Select the lofted surface. In the surface menu go to edit curve>duplicate surface curve.
19.In the side view, select the horizontal curves and delete them. (Or put them on a layer and turn them off—you can always use them for something else.)
20.Create a NURBS circle, scale the circle to .337, and extrude the circle along the vertical curves (Just like tutorial 3).
21.Put all those extruded surfaces and vertical curves on the layer structure.
22.Turn all the layers on. In the options window select the original circle. Move the time slider all the way to 200.
23.Scale the circle on the x to 30.
24.Rotate it on the z 45
25.In the channel editor go to channels > key all
26.Put a plane underneath the tower and render it.
No comments:
Post a Comment